Sunday, 24 August 2014

Console Based - Angular Motion Modeling

 Console Based - Angular Motion Modeling


This week in my physics class I was learning about angular motion and the various equations associated with it. So, I thought it might make a fun project to make some code that integrates everything I've learned, so far. I chose to do this because I wanted to use object oriented programming in a project as well as wanting to learn how to do more complex calculations in C++ (such as square root ect) and I also wanted to get a feel for how to arrange equations in code. 

Angular motion is very similar to regular motion in the manner that the equations of motion can be used if there is a constant acceleration. So I wrote down all the equations that I wanted to include in the program.


These equations can also be rearranged to find any of the values included but I haven't bothered writing the rearrangements down. 


The code 

In all my other console-based projects everything I've written has all been in one .cpp file but since I have created a class I wanted to spread declarations and definitions over different files. We will look  at that after what is in the "main()" function.


 The first part of the code is nothing special, nine different "float" variables are created and the user is given the opportunity to assign each of them a value. I chose to use "float" variables rather than integers because otherwise numbers wouldn't be allowed to be decimal at all and that isn't much use with circle equations, or many equations for that matter! If the user doesn't know the value of one of the variables they are told to assign it the value "-1" I thought this would be a good choice for a unknown variable because these numbers will not become negative (I know some are vector quantities but I am not associating direction with this particular program).


Next, a for loop is created. The reason for this will become clear after we have looked at the class functions. Inside the for loop an instance of the class "angular_motion" called k is created and all the values from the initialization step are passed to the constructor, known or not. Now the program tests which variables are "known" and which are set to -1. If a variable is set to -1 then the corresponding function is called from the "angular_motion" class. The return value of the function is then assigned to the variable. If that variable no longer equals -1, after the function has been called then is is printed to the screen. This process is repeated on all the variables 3 times though for reasons I will explain shortly. (note in the photo not all the if statements are included but this does happen to all the  variables).


angular_motion class

All the declarations for the angular_motion class are kept in a separate header file (angular_motion.h) the code looks like so.

The class has 9 different functions, of type float, and a constructor. It has 10 different float variables, the extra one being pi all stored in the private section. The constructor, in the definition, takes all of the variables from the "main()" function and copies them to the corresponding variable in the class. Since there is no scope between class variables and functions the "OBT_" (OBT just means obtain) functions do not need to take in variables. Lets take a closer look at one of the functions, as defined in the "angular_motion.cpp" file.


Above is the definition of the "OBT_ang_vel_i()" function which can use a possibility of three different equations to set the return value to the initial angular velocity. Each equation is a variation of what I was shown on paper at the start of this post. To choose what equation to use the program has to look at what variables it knows (ie, what variables aren't equal to -1). We can see this being done in the evaluations of each if statement. For example to use the first equation listed (u = v -at) the program must know the value of v (final angular velocity), a(angular acceleration) and t(time).
If the program doesn't know enough variables to do any of the equations then it simply returns the value -1 and the program will work out the others. Since there is a for loop it will come back to the function after hopefully knowing other variables and should be able to complete an equation.


Here's another function definition. If the program "knows" the value of "radius" then the equation area = pi*radius^2 is carried out but if not the program will continue to learn the other values (hopefully one of them is radius) and will come back to the area function and be able to "complete" it.

Downloads

I liked this project because it was more challenging than the others I have attempted and required me to use OOP, which is a habit I would like to get into for future programs. I used different files in one program for the first time, I used the header file <math.h> for the first time, I used classes outside of practice for the first time too.


The source files are available for download here.  Thanks and until next time.


Wednesday, 20 August 2014

Console Based - XOR encryption

Console Based - XOR Encryption


Continuing with my console based programming practice I decided to create a really basic encryption program in the console using the XOR(^) operator. The XOR operator takes the binary equivalent of any two variables and "ors" them together. For example.

Letter "h" ASCII equivalent is 104, that number as a binary is 1101000.

Number 20 in binary is 0010100.

1101000 ^ 0010100 = 1111100. 
And 1111100 in decimal is 124, which is assigned to ASCII character "|". In a similar fashion, to go back from "|" to "h" we simply XOR "|" with the key again. The key being 20 in this instance. 

1111100(|) ^ 0010100 (20) = 1101000, which is indeed decimal number 104 or "h".

The code

So, all the pre-processor commands are fairly standard at this point so I won't bother explaining them. The first big chunk of the function "main()" is really just there for creating the variables used in the rest of the code as well as providing a user interface with the console operators such as "cout" or "cin". A Boolean variable, "choice" is created and this will later define whether the function to encrypt or decrypt will be used. I chose a Boolean type variable for this because it only needed to have 2 different states and an integer or other type of variable takes up more space in system memory.
The next variable created is of the string type and is called "orig", this variable is the phrase to be encrypted or decrypted and is passed into the appropriate functions later in the program. It is assigned a value using the "cin" operator.
The last variable created is of integer type and is called "key" is is also user-assigned and will be passed into the encryption or decryption functions later on.


The function used to encrypt the user - chosen string is shown above. It is of return type string and takes in two variables, a string type called "encrypt" and an integer type called "key". These variables are assigned by the user as described above.
The for loop in the function starts by creating a variable to increment by one after each cycle (i). Th condition of the for loop is that it can only go ahead while "i" is less than the value of "string.size()". "string.size()" is a function included in the string class in the <string> library and basically just counts the letters in the string and returns a number, so if the user chose the word "blogger" then the "string.size()" function would give a value of 7 (since there are 7 letters in the word "blogger"). So the contents of the for loop take whichever member of the string the counter variable, i, is on (since a string is just like an array of char variables) and XORs it with the "key" variable. It then multiplies that value by 2 and then takes that variable and minuses 110. the reason the last two actions are applied is because I didn't want to just leave it with only one form of encryption. 2 is chosen as the multiplier since any number it multiplies will become even and hence be divided in the decryption stage without decimal places (which would be casted into integer variables and create an error, the numbers would be one out from their original values.). I had to minus 110 from all the values because otherwise they corresponded to characters that cannot be found on a common keyboard. Once all the values have been altered then the function returns the string all together and in the "main" function its new values are printed to the screen.


The decryption function is very similar except all the actions performed on the values are done in reverse order and are opposite to what they were before. Again the XOR operator is used with the key and as I described at the top of this article all the values should return to what they were originally.


Downloads

I enjoyed this project because it involved a little more background research. For example, I only had a vague idea of what the XOR operator does and had no idea it could be used as such a simple encryption device. I also didn't know anything about the string.size() function and had to research that to make my program work. A link to the project code files can be found here. Thanks for your time in reading this and until next time.


Saturday, 16 August 2014

Console Based - Square Number Generator

Console Based - Square Number Generator


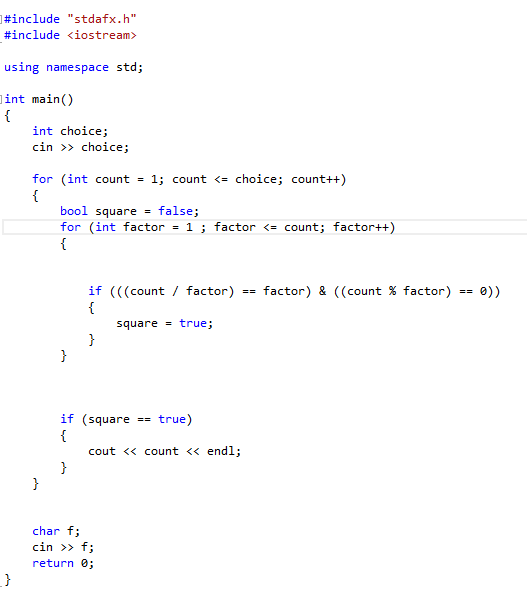
Adding to my recently uploaded prime numbers program. I have created a similar program showing all the square numbers from 0 to the persons choice. As can be seen above it works quite well, displayed are all the square numbers from 0 - 100000. I wont go into too much detail explaining the code I've written since its very similar to the prime numbers application's code. And this project was more as a proof of concept to myself than anything else.


Code

If you again I'm using two for loops the first one increments  by one after each cycle and is then tested by the second for loop to see if it is a square number. For example, lets say the outer loop is on a number of 63. The Boolean variable "square" is created and set to false. Then the inner for loop starts counting up numbers and each time it checks the number will go into the outer loop number ("count") with an evaluation the same as the number that went in and to make sure this is a factor and isn't a float value casted into an integer, dropping the decimal places, it also needs a remainder of zero. If that number is found then "square" is given a "true" value and the program continues. For the number 63 this will never happen since it isn't a square number, however, after the inner for loop has finished the outer for loop will increment "count" by one (raising it to 64) and the process will start again. When the variable "factor" reaches 8 it will divide perfectly into 64 (leaving a remainder of 0) which will make the "square" variable true and after it has checked for any other factors it will print the value 64 to the screen. 


Downloads
This project was good for just reinforcing what I had learned in the prime numbers code and was a great proof of concept.

The source file can be downloaded here. Thanks and until next time.

Console Based - Prime Number Display

Console Based - Prime Number Display


To continue with my C++ console projects I thought it would be fun to make a prime number program. The aim is for the user to type in a limit number, ie 900, and then for the program to count to that number and discard any numbers that aren't prime. (prime meaning a number with exactly 2 factors).

The code
The code is written in such a way where it thinks the number is prime until "proven" otherwise. A sort of guilty until proven innocent idea.


The pre-processor commands are nothing out of the ordinary. "stdafx.h" was included since I use Microsoft Visual Studio and <iostream> was included for it's console writing functionality. 
First the user is asked for an integer. This will become the variable c. The first for loop the compiler will encounter creates a variable called "count" and give it the value 2 (since 2 is the first prime number) and it specifies that only if "count" is lower or equal to "c" it may compile what is inside it's braces. First the Boolean variable "prime" is created and given the value "true" or 1, then the next for loop starts. 
In this for loop an integer called "potfactor" is created and given the value 2. And the contents of this for statement can only be used if  "potfactor" is less than "count". Then the for loop would test if a number had any factors that weren't one or itself. This was done using the "%" operator. This operator produces the remainder if "count" would be divided by "potfactor"  and if this remainder equals 0 then "potfactor" must be a factor. Since it goes into the "count" without any remainder. After this is completed "potfactor" is incremented by one and the test for a factor is repeated until "potfactor" cannot increase without becoming equal to "count". At this point the "count" increments by one, as a result of the first for loop, and this number is then tested for factors ("potfactor" returns to 2). If any value of "count" manages to come out with no factors the reassignment of "prime" to false will not happen and it will be printed to the console window. However if at any time a value of "count is found to have a factor then it will not be printed to the window. 

Here is the whole thing in table format in case my limited explanation skills are confusing anyone.


Downloads


The code I wrote is available for download here.
I liked this project because it involved some complex thinking and it allowed me to practice using for loops in a useful scenario. 

Thanks and until next time.


Monday, 11 August 2014

Console Based - C++ Clock


Console Based - C++ Clock

Since my Arduino project I have decided to really start brushing up what C++ I know by making a series of short, console based projects that will hopefully progress in difficulty. The first of which is the clock I put together in a short period of time today. This being the first one it was pretty easy and didn't require too much of my time. All the code which I wrote is contained within one source file, it was just more convenient to do so - since there are only two functions really.

Included Header Files

Of course "stdafx.h" was included since I'm using Microsoft Visual Studio.
<iostream> was included so I could use the console writing apparatus(cout, cin, ect).
I included the <string> header since I had recently learned about it and had the idea to really easily create a cheesy "password" piece of functionality at the beginning of the program.
<windows.h> is required for the Sleep() function which when set to 1000 ms would form the basis of the timekeeping.
Initialization  steps


Above is the code that allows the user to enter a password to use the clock, in this case the password is the word "pass" I could have done this by creating an array of char variables but I'm not quite comfortable with that yet, if I was I would be creating a basic encryption program not a clock! Alas, the next few lines allow the user to set the time, including hours, minutes and seconds.  The last line shown is a safety feature in case the user chooses numbers that aren't compatible with the clock, or even letters at that.
 A consequence was included if the password was wrong.

Creating pointers
 Since the counting function would be in an infinite loop I decided it was best to keep the set variables (seconds, minates, hours) in a separate function and point to them from the counting function, which is labeled "check" in my source code.
 When the pointers were first created I "nulled" them, perhaps unnecessarily, by making them equal to 0 before they were assigned any values. Just a good habit to get into, especially according Murphy's Law.

Void check() 


The check function is a rather crude mechanism which, due to its infinite characteristics, I am sure wastes lots of memory each time a local copy of the variables are created. However with the C++ skillset I know its the only way I could think of to get the job done. 
Lines 3 though 8 increment the value of seconds that the user initially specified, taking a one second gap between each and of course printing the result to the screen. All this is able to happen only while the value of seconds is less than 59. when it reaches that number two different things could happen. The minute count could increase by one (lines 12 - 15) or the hour could increase by one (lines 16 -22) the latter of the two inevitably means that the minutes must also change. The last line of code repeats the function but uses the new values for seconds, minutes and hours. So when the function restarts the seconds value will always be O and the other two will have changed accordingly.

Downloads
This project was useful to me because I was able to use pointers in a practical application and involved plenty of transferring variables between functions. For someone who is learning these are both great skills to practice. Not to mention I was able to do it in an afternoon.

If you want to download the program for further inspection or running click here 

My apologies for all the ugly in my code. I'm still learning. Thank you for your time in reading this and until next time.


Sunday, 10 August 2014

Project - Splendabot


Project - Splendabot


As a budding engineer who is interested in both electronics and coding, a robot was an obvious summer project for me to take on. The aim for the robot was to be able to move using two motors connected to an h-bridge circuit, display outputs through some sort of display and to accept some sort of input (ie buttons).

Parts
An arduino was an obvious choice for a micro-controller since I am already learning c++ and the arduino interface is easy to code for and has a wide range of options for all sorts of jobs. I chose to use the arduino Nano, paired with a breakout board to make connections less confusing and more elegant. 


The motor circuity was an h-bridge control board that is often used with arduino known as the L298N, again I picked one up very cheap and if you would like to see the model in more detail take a look here. (https://www.youtube.com/watch?v=1Q0ZwpycbzY)


For the output I used the beloved Nokia 5110 display.  They are cheap, readily available and have a great library from Adafruit to help a whole load when it comes to the coding. I snatched one up for around £1. If you would like more information on how the nokia 5110 interfaces with arduino, using the adafruit library take a look here. (https://www.youtube.com/watch?v=M9XBFomX7JI)


The frame is built from meccano. I chose this because I have plenty of practice with it from my childhood years and it was already lying around my house.

The motor assembly is from an old remote control vehicle of some sort. It was chosen since the gears and everything were all in place for me and fixing it to the meccano frame was relatively easy. 

To act as an input signal I just created a harness of four pushbuttons (scavenged from a broken digital photo frame) and resistors, arranged in such a way that each would send a separate signal to the arduino. 

Code


When all the parts arrived I started having fun with the sketch interface for ardunio (this is my first arduino adventure, and my first programming adventure away from following internet tutorials) I had a lot to learn so I made sure i was comfortable with coding for all the parts separately before putting everything together. 
For example this is a sample of me getting to grips with the nokia 5110.  

Understanding the button inputs was much easier. Here is my piece of code which just evaluates a Boolean statement based on the read value of the "button state". 


 Last of all I created functions for each of the movement actions that the robot would perform. By applying a "HIGH" voltage to the correct pins on the l298n different moves could be observed.  Here is my function for moving forward.


Final code

The code which I produced is nothing too special and if I had more time I would put all the function definitions in a separate included file however this project was as much about the hardware too and I'm proud my first adventure with robotics has been such a success.


Regardless, the arduino code can be downloaded and examined by anyone here.

Thank you for your time in reading this and until next time.