Matrices in Java
Over the past two weeks I've been working on a series of Java classes which model different types of number matrices that I've been learning about in Advanced Higher Maths in school. This blog serves as a summary of my work and a description of all the code I've written. All the code snippets that follow are hosted by GitHub and all the formulas were made with a website called www.codecogs.com
Matrix Class
The class I've written above models a general Matrix, it has methods to model the most basic of matrix operations. Lets take a closer look at the code (since my Javadoc comments aren't exactly descriptive!).
Instance variables. (lines 3, 4, 5)
The class has three instance variables; int rows, int columns and double[][] theMatrix. rows is a simple variable holds the number of rows in an instance of the class matrix. It is initialized in the constructor. columns is similar to to rows, it is also initialized in the constructor and holds the number of columns in an instance of the class Matrix. I have made both of these the int type because they are both whole numbers. In fact I could have even made them unsigned int because the number of rows and columns should not be negative. rows and columns have their own getter methods but no setter. This is because there should be no reason to change the number of rows and columns once an instance of Matrix is created. rows and columns are used in methods to iterate though a matrix using for-loops. The last instance variable is theMatrix and it is of type double[][] which means that it is a two-dimensional array which holds components of type double. When I first wrote the program I made theMatrix an int array, but this caused me to run into problems later on when some of the methods involved fractions.
Constructor - Matrix(int setRows, int setColumns) (lines 6-26)
The Matrix class has only one constructor and it takes two arguments, both of type int, setRows and setColumns. The constructor simply sets the values of the instance variables rows and columns to their corresponding arguments. Next the constructor initializes the theMatrix variable. To do this it calls a method createMatrix() and puts its return value into the theMatrix variable.
createMatrix() (lines 17- 24)
This method takes no arguments. It uses the instance variables rows and columns, by calling their getter methods, to create a new two dimensional double[][] array. The array is then returned.
getter methods (lines 26 - 37)
There are getter methods for each of the instance variables; getMatrix() for theMatrix, getRows() for rows and getColumns() for columns. I haven't written Javadoc for these as they are very straight forward. Each method returns the value of the instance variable it corresponds to. Getters are important in java because they promote data hiding.
setAMatrixValue(int posX, int posY, double val) (lines 38 - 48)
This is a setter method for setting the value of one component of the array referenced by theMatrix. It simply uses the integer arguments posX and posY to access the right component and then sets the component equal to the double argument val.
getAMatrixValue(int Xpos, int Ypos) (lines 53 - 62)
This is a getter function which returns a value of a component of the array referenced by theMatrix which is defined by the arguments Xpos and Ypos.
multiplyMatrix(double aFactor) (lines 63 - 76)
This method uses two for-loops to iterate though all the components of the array referenced by theMatrix. It is able to iterate though every component without going out of bounds of the array by calling the getRows() and getColumns() methods in the Boolean-section of the for-loops. Once it reaches a component it simply sets the component equal to whatever it was before multiplied by the argument aFactor. It then moves to the next component. When all components have been visited the method is finished.
multiplyMatrix(double factor, double[][] mat) (lines 77 -93)
This method overloads the method multiplyMatrix(double aFactor) and allows the object that called the method to choose what matrix it is multiplying out. Apart from that it works the same way, using two for-loops to iterate though the matrix, mat, at each component it multiplies its value by the argument factor.
printAVal(int Xpos, int Ypos) (lines 95 - 103)
This method simply uses the System.out.println(String) method to print the value of a component defined by the arguments Xpos and Ypos.
matrixToString(double[][] aMatrix) (lines 113 - 126)
This method iterates though the array referenced by aMatrix and uses System.out.println(String) to output each component.
The Matrix class as a whole can't do very many complex things. This is because from a programming perspective I don't know what dimensions the matrix will be so I need to have more specific subclasses of Matrix before things start getting interesting.
The SquareMatrix class is a subclass of (extends) the Matrix class. Therefore it inherits all the methods which I have just specified. It is also able to do things which are exclusive to matrices which are square. For example it is able to transpose.
instance variables (line 3)
The SquareMatrix class does have one more instance variable of type integer. It is called order. The order of a square matrix is a measurement of how big it is, an order 2 square matrix would have 4 components, an order 3 matrix would have 9 components etc. Again, this could have been an unsigned int type since matrices do not have negative orders. order also has a getter method of its own.
Constructor - SquareMatrix(int n) (lines 5- 14)
The constructor of SquareMatrix takes one argument of type int, n. The first thing it does is call the constructor of its superclass, Matrix. Passing the value n to both of its arguments. This will create a Matrix object but since both the setRows and setColumns arguments are the same the array theMatrix will be square. Next it initializes the value of order to the argument n.
matrixTranspose(double [][] mat) (lines 15 - 31)
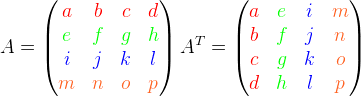
The transpose of a matrix is found by reflecting all the numbers in the leading edge.
.png)
The diagram above shows a matrix(A) and it's transpose(At).
The method takes one argument of type double[][] this corresponds to the matrix to be transposed. The first thing the method does is create a new double[][] array which has the same dimensions as the array referenced by theMatrix. However all the components are undefined at this point. This array is now referenced by the argument, mat. (line 22). Next, the method iterates though all the components of the array referenced by mat. (this is done with for-loops in the same way as previously) At every component it sets it equal to the return value of the getAMatrixValue(int, int) where the parameters are the opposite of the component location. We can think of the int variables declared in the for-loop header as co-ordinates of the components we are trying to access. This sets whatever value is in the component of location (x, y) to whatever component is in the array referenced by theMatrix with co-ordinate(y, x).
After each component has been written the method returns the array referenced by mat.
SquareMatrix doesn't have many methods right now but I've written it in such a way which will make it easy to add functionality as I continue to learn in school.
TwoByTwoMatrix is a subclass of (extends) SquareMatrix. So it inherits all the methods in the Matrix class and the SquareMatrix class. Since a square matrix of order two is quite a specific scenario I was able to code specifically to the components of the matrix. And since there is a set number of components in this kind of matrix I knew I wouldn't miss any out. This allowed me to program for much more complex operations.
Class Variables (line 3)
An identity matrix is specific to a particular square matrix. It is arranged such that only the value 1 exists along the leading edge and all the other values are 0.
The diagram above shows the identity matrix of a square matrix of order 2 (left) and the identity matrix of a square matrix of order 3 (right).
Since the identity matrix is common to every instance of TwoByTwoMatrix then it can be made a class variable, hence given the static-type. Since the identity matrix is constant it can be made a constant variable, hence given the final-type. These types of variables are often written in block capitals, this is not a requirement its just good practice to do so to conform to common programming style.
The variable IDENTITY_MATRIX is of type double[][] and is initialized as soon as it is created. It is initialized to be equivalent to the matrix in the diagram above (left).
Constructor - TwoByTwoMatrix() (lines 5 - 11)
This constructor is very simple, it only calls the SquareMatrix() constructor with parameter 2. There are no variables to initialize and no methods to call.
determinant() (lines 68 -77)
The determinant of a matrix is a value which is used in other matrix calculations. In this program I will be using it to find the inverse matrix. The determinant of a square matrix of order 2 is found by multiplying the top left number and the bottom right number and then taking away the product of the top right number and the bottom left number. See diagram below, matrix(left) determinant(right).
.png)
the determinant() method first created a new double variable and then assigns it to the value created by the corresponding components in the formula. It uses the getAMatrixValue(int, int) to get the values stored in the components that correspond to a,b,c and d in the above equation. The determinant is then assigned to the variable determinant and returned by the method.
adjoint() (lines 78 -90)
The adjoint of a matrix is another piece of information which is used to calculate the inverse of that matrix. However, unlike the determinant, the adjoint represented as a matrix. To find the adjoint of a square matrix of order 2. You simply swap the top-left term and the bottom-right term and make the other two negative.
 The adjoint() method creates a new double array with 4 components that are in a square shape. it then uses the getAMatrixValue(int,int) method to find out all the values that correspond to a,b,c and d on the above diagram and writes those values to the newly creates array referenced by adj in the order shown on the right. It then returns this matrix which is equivalent to the adjoint matrix of the array referenced by theMatrix.
doesInverseExist() (lines 34 - 50)
There are some matrix arrangements where no inverse exists, these kinds of matrices are referred to as singular. If the determinant of a matrix is equal to zero then it is singular and no inverse exists.
The method doesInverseExist() calls the determinant() method and if it's equal to 0 then the method will return false. If its not equal to zero then it will call the determinant() method again and if it's not equal to zero it will return true.
findInverse() (lines 14 - 33)
The inverse of a matrix is the matrix that when multiplied by the original matrix will produce the identity matrix for that order. It's rather like how (1/3)*(3) = 1 since 3 is the number and (1/3) is the inverse of 3. To find the inverse of the matrix you must first have the determinant of the matrix and the adjoint (or adjugate) of the matrix. I have written methods for both. The inverse of a matrix is equal to the adjoint matrix multiplied by (1/ the determinant).

The findInverse() method first needs to check if an inverse actually exists. It does this by evaluating the doesInverseExist() method in an if statement. If it evaluates to false then the method uses System.out.println(String) to tell the user that no inverse exists for the array referenced by theMatrix.
If it evaluates to true then the method will create a new double[][] array instance variable called inverseMatrix. Then, it will call the multiplyMatrix(int, double[][]) method passing the two arguments as (1 / determinant()) , (adjoint()). These correspond to the above formula. The return value that multiplyMatrix(int, double[]) produces is then assigned to the inverseMatrix local variable. Finally inverseMatrix is returned.
multiplyMatrices(double[][], double[][])
Multiplying two matrices together is not the same as multiplying an entire matrix by a factor. Therefore it requires a different method. Multiplying matrices together is done with the formula as follows:
 The method multiplyMatrices(double[][], double[][]) first creates a new double[][] array of order 2. And then assigns each of its values to the corresponding components in the formula. The values a, b, c, d, e, f and g are found inside the arguments mat1 and mat2.
isOrthogonal(double[][])
Matrices are said to be orthogonal if their transverse multiplied by the original matrix is equal to the identity matrix for that order. the isOrthogonal(double[][]) method first creates a new double[][] array called trans. And, using the matrixTranspose(double[][]) method, it sets trans equal to the transpose of the array referenced by mat. Next, using the multiplyMatrices(double[][], double[][]) method it evaluates if the returned product is equal to the identity matrix. The value of the identity matrix is stored in the array referenced by IDENTITY_MATRIX declared at the beginning of the class. If the product is the identity matrix then the method returns true. If the product is not the identity matrix the method returns false.
The determinant() method creates three instances of the TwoByTwoMatrix class and sets their values to the ones that correspond to the formula above. Once all the values have been set, the method calculates the determinant of each TwoByTwoMatrix. Then it returns whatever matrix value corresponds to a multiplied by the determinant of the first instance of TwoByTwoMatrix, minus whatever matrix value corresponds to b multiplied by the second instance of TwoByTwoMatrix, plus whatever value corresponds to c multiplied by the third instance of TwoByTwoMatrix.
findInverse()
This method works exactly the same way as the findInverse() method in the TwoByTwoMatrix class. Except, it is calling different determinant() and adjoint() methods. It is calling the ones within this class instead.
doesInverseExist()
Again, this works exactly the same way as it does in an instance of TwoByTwoMatrix.
adjoint()
The adjoint() method for the ThreeByThreeMatrix class is fairly complex. In maths at school we weren't actually given a formula for this, instead we used elementary row operations. But since this would be far more difficult to program I browsed the internet to find a more suitable solution.I found this page which illustrates a formulaic approach. Unfortunately, it is a little complicated. Below is my best attempt at a formula to define it.

Again, the modulus signs here mean the determinant of the matrix enclosed within them. So the adjoint of a square matrix of order three is made up of the determinant of nine square matrices of order 2 (center) with the signs on the right.
The adjoint() method is similar to the determiant() method in that it creates instances of the class TwoByTwoMatrix, assigns them values and then finds their determinant. Once it has found the determinant of each sub-matrix it then puts them into another double[][] array referenced by the variable detMat. Using two for-loops, each value in detMat is then multiplied by its corresponding sign in the matrix on the right and assigned into another double array referenced by the variable ans. ans is then returned.
By writing out all my thoughts about the classes that I've written there are a number of things that have been brought to my attention that I could improve on to make the program more consistent. Firstly, in most of the instances where I have used double[][] to reference a newly created matrix inside a method such as findInverse() or adjoint() I could have made these instances of an appropriate matrix class. The same can be said for identity matrices, they could be made an instance of an appropriate matrix class rather than a double[][] array. There even could have been a separate class all together just for identity matrices.
Another thing I could improve on is actually interacting with the program. When I was testing the program out I just used a class to create instances of the objects and call methods to check if they worked. I got all my feedback from the system-output window. A much better solution would be to become more familiar with the java.swing library to help me create an actual GUI to interact with the program. These perhaps, are topics for another blog.
I liked this project because it not only challenged my knowledge of Java, but also my knowledge of maths. And with exams coming up soon I found it to be a very intuitive way to learn and memorize formula. I'm learning more about code everyday and I really enjoy being able to use it in a practical application such as this one.
Thanks for reading and until next time.
Instance variables. (lines 3, 4, 5)
The class has three instance variables; int rows, int columns and double[][] theMatrix. rows is a simple variable holds the number of rows in an instance of the class matrix. It is initialized in the constructor. columns is similar to to rows, it is also initialized in the constructor and holds the number of columns in an instance of the class Matrix. I have made both of these the int type because they are both whole numbers. In fact I could have even made them unsigned int because the number of rows and columns should not be negative. rows and columns have their own getter methods but no setter. This is because there should be no reason to change the number of rows and columns once an instance of Matrix is created. rows and columns are used in methods to iterate though a matrix using for-loops. The last instance variable is theMatrix and it is of type double[][] which means that it is a two-dimensional array which holds components of type double. When I first wrote the program I made theMatrix an int array, but this caused me to run into problems later on when some of the methods involved fractions.
Constructor - Matrix(int setRows, int setColumns) (lines 6-26)
The Matrix class has only one constructor and it takes two arguments, both of type int, setRows and setColumns. The constructor simply sets the values of the instance variables rows and columns to their corresponding arguments. Next the constructor initializes the theMatrix variable. To do this it calls a method createMatrix() and puts its return value into the theMatrix variable.
createMatrix() (lines 17- 24)
This method takes no arguments. It uses the instance variables rows and columns, by calling their getter methods, to create a new two dimensional double[][] array. The array is then returned.
getter methods (lines 26 - 37)
There are getter methods for each of the instance variables; getMatrix() for theMatrix, getRows() for rows and getColumns() for columns. I haven't written Javadoc for these as they are very straight forward. Each method returns the value of the instance variable it corresponds to. Getters are important in java because they promote data hiding.
setAMatrixValue(int posX, int posY, double val) (lines 38 - 48)
This is a setter method for setting the value of one component of the array referenced by theMatrix. It simply uses the integer arguments posX and posY to access the right component and then sets the component equal to the double argument val.
getAMatrixValue(int Xpos, int Ypos) (lines 53 - 62)
This is a getter function which returns a value of a component of the array referenced by theMatrix which is defined by the arguments Xpos and Ypos.
multiplyMatrix(double aFactor) (lines 63 - 76)
This method uses two for-loops to iterate though all the components of the array referenced by theMatrix. It is able to iterate though every component without going out of bounds of the array by calling the getRows() and getColumns() methods in the Boolean-section of the for-loops. Once it reaches a component it simply sets the component equal to whatever it was before multiplied by the argument aFactor. It then moves to the next component. When all components have been visited the method is finished.
multiplyMatrix(double factor, double[][] mat) (lines 77 -93)
This method overloads the method multiplyMatrix(double aFactor) and allows the object that called the method to choose what matrix it is multiplying out. Apart from that it works the same way, using two for-loops to iterate though the matrix, mat, at each component it multiplies its value by the argument factor.
printAVal(int Xpos, int Ypos) (lines 95 - 103)
This method simply uses the System.out.println(String) method to print the value of a component defined by the arguments Xpos and Ypos.
matrixToString(double[][] aMatrix) (lines 113 - 126)
This method iterates though the array referenced by aMatrix and uses System.out.println(String) to output each component.
The Matrix class as a whole can't do very many complex things. This is because from a programming perspective I don't know what dimensions the matrix will be so I need to have more specific subclasses of Matrix before things start getting interesting.
SquareMatrix Class
instance variables (line 3)
The SquareMatrix class does have one more instance variable of type integer. It is called order. The order of a square matrix is a measurement of how big it is, an order 2 square matrix would have 4 components, an order 3 matrix would have 9 components etc. Again, this could have been an unsigned int type since matrices do not have negative orders. order also has a getter method of its own.
Constructor - SquareMatrix(int n) (lines 5- 14)
The constructor of SquareMatrix takes one argument of type int, n. The first thing it does is call the constructor of its superclass, Matrix. Passing the value n to both of its arguments. This will create a Matrix object but since both the setRows and setColumns arguments are the same the array theMatrix will be square. Next it initializes the value of order to the argument n.
matrixTranspose(double [][] mat) (lines 15 - 31)
The transpose of a matrix is found by reflecting all the numbers in the leading edge.
The method takes one argument of type double[][] this corresponds to the matrix to be transposed. The first thing the method does is create a new double[][] array which has the same dimensions as the array referenced by theMatrix. However all the components are undefined at this point. This array is now referenced by the argument, mat. (line 22). Next, the method iterates though all the components of the array referenced by mat. (this is done with for-loops in the same way as previously) At every component it sets it equal to the return value of the getAMatrixValue(int, int) where the parameters are the opposite of the component location. We can think of the int variables declared in the for-loop header as co-ordinates of the components we are trying to access. This sets whatever value is in the component of location (x, y) to whatever component is in the array referenced by theMatrix with co-ordinate(y, x).
After each component has been written the method returns the array referenced by mat.
SquareMatrix doesn't have many methods right now but I've written it in such a way which will make it easy to add functionality as I continue to learn in school.
TwoByTwoMatrix Class
Class Variables (line 3)
An identity matrix is specific to a particular square matrix. It is arranged such that only the value 1 exists along the leading edge and all the other values are 0.
The diagram above shows the identity matrix of a square matrix of order 2 (left) and the identity matrix of a square matrix of order 3 (right).
Since the identity matrix is common to every instance of TwoByTwoMatrix then it can be made a class variable, hence given the static-type. Since the identity matrix is constant it can be made a constant variable, hence given the final-type. These types of variables are often written in block capitals, this is not a requirement its just good practice to do so to conform to common programming style.
The variable IDENTITY_MATRIX is of type double[][] and is initialized as soon as it is created. It is initialized to be equivalent to the matrix in the diagram above (left).
Constructor - TwoByTwoMatrix() (lines 5 - 11)
This constructor is very simple, it only calls the SquareMatrix() constructor with parameter 2. There are no variables to initialize and no methods to call.
determinant() (lines 68 -77)
The determinant of a matrix is a value which is used in other matrix calculations. In this program I will be using it to find the inverse matrix. The determinant of a square matrix of order 2 is found by multiplying the top left number and the bottom right number and then taking away the product of the top right number and the bottom left number. See diagram below, matrix(left) determinant(right).
The adjoint of a matrix is another piece of information which is used to calculate the inverse of that matrix. However, unlike the determinant, the adjoint represented as a matrix. To find the adjoint of a square matrix of order 2. You simply swap the top-left term and the bottom-right term and make the other two negative.
doesInverseExist() (lines 34 - 50)
There are some matrix arrangements where no inverse exists, these kinds of matrices are referred to as singular. If the determinant of a matrix is equal to zero then it is singular and no inverse exists.
The method doesInverseExist() calls the determinant() method and if it's equal to 0 then the method will return false. If its not equal to zero then it will call the determinant() method again and if it's not equal to zero it will return true.
findInverse() (lines 14 - 33)
The inverse of a matrix is the matrix that when multiplied by the original matrix will produce the identity matrix for that order. It's rather like how (1/3)*(3) = 1 since 3 is the number and (1/3) is the inverse of 3. To find the inverse of the matrix you must first have the determinant of the matrix and the adjoint (or adjugate) of the matrix. I have written methods for both. The inverse of a matrix is equal to the adjoint matrix multiplied by (1/ the determinant).
If it evaluates to true then the method will create a new double[][] array instance variable called inverseMatrix. Then, it will call the multiplyMatrix(int, double[][]) method passing the two arguments as (1 / determinant()) , (adjoint()). These correspond to the above formula. The return value that multiplyMatrix(int, double[]) produces is then assigned to the inverseMatrix local variable. Finally inverseMatrix is returned.
multiplyMatrices(double[][], double[][])
Multiplying two matrices together is not the same as multiplying an entire matrix by a factor. Therefore it requires a different method. Multiplying matrices together is done with the formula as follows:
isOrthogonal(double[][])
Matrices are said to be orthogonal if their transverse multiplied by the original matrix is equal to the identity matrix for that order. the isOrthogonal(double[][]) method first creates a new double[][] array called trans. And, using the matrixTranspose(double[][]) method, it sets trans equal to the transpose of the array referenced by mat. Next, using the multiplyMatrices(double[][], double[][]) method it evaluates if the returned product is equal to the identity matrix. The value of the identity matrix is stored in the array referenced by IDENTITY_MATRIX declared at the beginning of the class. If the product is the identity matrix then the method returns true. If the product is not the identity matrix the method returns false.
ThreeByThreeMatrix Class
ThreeByThreeMatrix is a subclass of (extends) SquareMatrix. So it inherits all the methods in the Matrix class and the SquareMatrix class. Since ThreeByThreeMatrix also specifies the order of the square matrix it gets the same advantages as TwoByTwoMatrix in that I am now able to program for a specific circumstance.
Class Variables
Just like the TwoByTwoMatrix class square matrices of order three also have an identity matrix. And again it is declared static and final.
Constructor - ThreeByThreeMatrix()
This constructor works exactly the same way as the constructor for TwoByTwoMatrix, except this time it passes 3 into the constructor of SquareMatrix instead of 2.
determinant()
To find the determinant of a square matrix of order 3 a more complex process is required than that of one with order 2.

In the above formula, the matrices enclosed in modulus operators signify the determinant of that matrix. Since I already have a method to calculate the determinant of a 2x2 matrix then I can use it to help calculate the determinant of this, bigger, matrix.Class Variables
Just like the TwoByTwoMatrix class square matrices of order three also have an identity matrix. And again it is declared static and final.
Constructor - ThreeByThreeMatrix()
This constructor works exactly the same way as the constructor for TwoByTwoMatrix, except this time it passes 3 into the constructor of SquareMatrix instead of 2.
determinant()
To find the determinant of a square matrix of order 3 a more complex process is required than that of one with order 2.
The determinant() method creates three instances of the TwoByTwoMatrix class and sets their values to the ones that correspond to the formula above. Once all the values have been set, the method calculates the determinant of each TwoByTwoMatrix. Then it returns whatever matrix value corresponds to a multiplied by the determinant of the first instance of TwoByTwoMatrix, minus whatever matrix value corresponds to b multiplied by the second instance of TwoByTwoMatrix, plus whatever value corresponds to c multiplied by the third instance of TwoByTwoMatrix.
findInverse()
This method works exactly the same way as the findInverse() method in the TwoByTwoMatrix class. Except, it is calling different determinant() and adjoint() methods. It is calling the ones within this class instead.
doesInverseExist()
Again, this works exactly the same way as it does in an instance of TwoByTwoMatrix.
adjoint()
The adjoint() method for the ThreeByThreeMatrix class is fairly complex. In maths at school we weren't actually given a formula for this, instead we used elementary row operations. But since this would be far more difficult to program I browsed the internet to find a more suitable solution.I found this page which illustrates a formulaic approach. Unfortunately, it is a little complicated. Below is my best attempt at a formula to define it.
The adjoint() method is similar to the determiant() method in that it creates instances of the class TwoByTwoMatrix, assigns them values and then finds their determinant. Once it has found the determinant of each sub-matrix it then puts them into another double[][] array referenced by the variable detMat. Using two for-loops, each value in detMat is then multiplied by its corresponding sign in the matrix on the right and assigned into another double array referenced by the variable ans. ans is then returned.
By writing out all my thoughts about the classes that I've written there are a number of things that have been brought to my attention that I could improve on to make the program more consistent. Firstly, in most of the instances where I have used double[][] to reference a newly created matrix inside a method such as findInverse() or adjoint() I could have made these instances of an appropriate matrix class. The same can be said for identity matrices, they could be made an instance of an appropriate matrix class rather than a double[][] array. There even could have been a separate class all together just for identity matrices.
Another thing I could improve on is actually interacting with the program. When I was testing the program out I just used a class to create instances of the objects and call methods to check if they worked. I got all my feedback from the system-output window. A much better solution would be to become more familiar with the java.swing library to help me create an actual GUI to interact with the program. These perhaps, are topics for another blog.
I liked this project because it not only challenged my knowledge of Java, but also my knowledge of maths. And with exams coming up soon I found it to be a very intuitive way to learn and memorize formula. I'm learning more about code everyday and I really enjoy being able to use it in a practical application such as this one.
Thanks for reading and until next time.


